## Understanding the goal of a 72-hour emergency power plan
A 72-hour emergency solar power system is designed to keep essential devices running during outages without the footprint of a full home installation. The objective is clear: identify critical loads, size them for 72 hours of operation, and provide portable energy where you need it most. Think of this as a practical guide to how to build a tiny solar backup that supports a 72 hour power plan for emergencies.
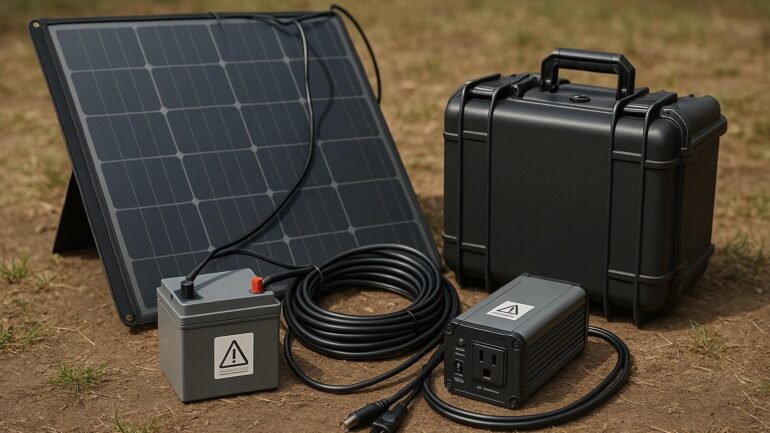
## Core components for a tiny solar backup
A compact system relies on three core elements: a portable solar panel, a compatible battery, and a charge controller or power management device. Optional but helpful are a small inverter, fuses, switch, and protective enclosures for safe operation.
### Sizing for 72 hours of essential loads
Step one is listing what you need to power for three days—lighting, communication, medical devices, fans, and any critical electronics. Prioritize loads, then calculate energy needs in watt-hours (Wh) and convert to daily or total 72-hour targets. For example, a few LED lights (5–10 W each), a phone charger, a small router, and a compact fan may total only 150–300 Wh per day, or roughly 450–900 Wh for the full 72 hours.
### Battery options and capacity
Choose a battery chemistry that fits your needs and safety preferences. Lithium iron phosphate (LiFePO4) offers long life and robust safety but at a higher upfront cost; sealed lead-acid is affordable but heavier and shorter-lived. Ensure your battery capacity (Ah) aligns with your total Wh target, considering inverter efficiency and depth of discharge.
## Step-by-step build guide
1) Gather a small portable solar panel (100–200 W, foldable or rigid) and a compatible 12–24 V battery. 2) Add a charge controller or solar regulator suited to your panel and battery. 3) Connect a compact, pure-sine-wave inverter if you need AC power; otherwise DC devices can run directly. 4) Include fuses, a proper disconnect, and an accessible enclosure. 5) Test connections with a multimeter and verify voltage and current levels before first use. 6) Label cables and keep the setup organized for quick deployment.
## Safe testing, maintenance, and best practices
– Test monthly and after any transport; inspect connections for corrosion or loose terminals.
– Use reputable, UL-listed components rated for outdoor use.
– Avoid deep discharges; don’t run a battery flat.
– Store in a cool, dry location and keep away from flammable materials.
– Practice a simple outage drill so you know exactly what to power and when.