Solar panel wiring mistakes can turn your DIY dream into a costly nightmare. Whether you’re installing your first home system or upgrading your RV setup, proper wiring forms the backbone of safe, efficient solar power. Furthermore, understanding these common errors helps you avoid dangerous situations and expensive repairs.
Many beginners jump into solar installations without fully grasping electrical fundamentals. However, with the right knowledge and careful attention to detail, you can wire your system like a pro. Additionally, recognizing warning signs early prevents small problems from becoming major headaches.
Understanding Solar Panel Wiring Fundamentals
Before diving into common wiring mistakes, let’s establish the basics of solar electrical systems. Your solar panels generate DC electricity that flows through wires to charge controllers, batteries, and inverters. Moreover, each component requires specific voltage and amperage ratings to function safely.
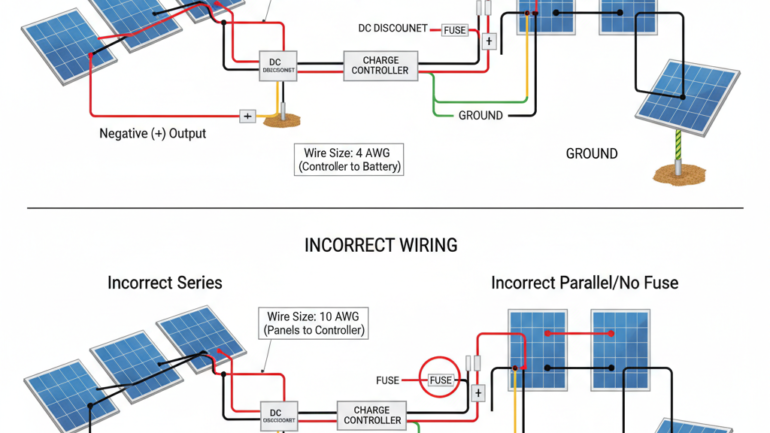
Series wiring connects panels end-to-end, increasing voltage while maintaining the same amperage. Conversely, parallel wiring connects positive to positive and negative to negative, keeping voltage constant while adding amperage. Understanding this difference prevents the first major mistake many DIYers make.
Proper wire sizing depends on current flow and distance traveled. Undersized wires create resistance, generate heat, and waste precious solar energy. Therefore, always consult wire sizing charts before making connections.
Mistake #1: Inadequate Wire Sizing and Gauge Selection
Undersized wiring represents the most common and dangerous mistake in DIY solar installations. Many beginners assume thinner wires save money and space. Unfortunately, insufficient wire gauge causes voltage drop, overheating, and potential fire hazards.
Wire gauge requirements increase with higher current and longer distances. For example, a 20-amp circuit running 10 feet needs 12 AWG wire minimum. However, the same current over 50 feet requires 8 AWG wire to prevent dangerous voltage drop.
How to Fix It:
- Calculate maximum current for each circuit using Ohm’s Law
- Measure exact wire run distances, including vertical drops
- Use wire sizing calculators or NEC tables for proper gauge selection
- Allow 25% safety margin above calculated minimums
Always verify wire temperature ratings match your installation environment. Meanwhile, marine-grade or THWN-2 wire provides superior protection in challenging conditions.
Mistake #2: Improper Series and Parallel Connections
Mixing series and parallel wiring without understanding the consequences creates system imbalances and reduced performance. Many DIYers connect panels randomly, assuming more connections equal more power. However, mismatched configurations actually decrease overall system output.
Series connections add voltages together while keeping amperage constant. Parallel connections maintain voltage while adding amperage. Consequently, combining different panel types or mixing connection methods creates electrical mismatches.
How to Fix It:
- Use identical panels within each series string
- Match voltage ratings when connecting strings in parallel
- Install string fuses for each parallel connection
- Consider power optimizers for complex installations
Additionally, shading on one panel in a series string affects the entire string’s performance. Therefore, parallel connections often work better for installations with partial shading issues.
Mistake #3: Missing or Inadequate Overcurrent Protection
Skipping fuses and breakers seems like an easy way to save money and simplify installations. However, overcurrent protection devices prevent fires and equipment damage during fault conditions. Moreover, most local codes require proper fusing for legal installations.
Each parallel string needs individual fusing to prevent backfeed current from damaging panels. Additionally, main system disconnects must handle the total system current safely. Without proper protection, short circuits can cause catastrophic failures.
How to Fix It:
- Install string fuses rated at 125% of panel short-circuit current
- Use DC-rated fuses and breakers designed for solar applications
- Add main disconnects accessible from both inside and outside
- Consider combining boxes to centralize all overcurrent protection
Furthermore, clean wiring practices make troubleshooting and maintenance much easier. Always label circuits clearly and maintain detailed wiring diagrams.
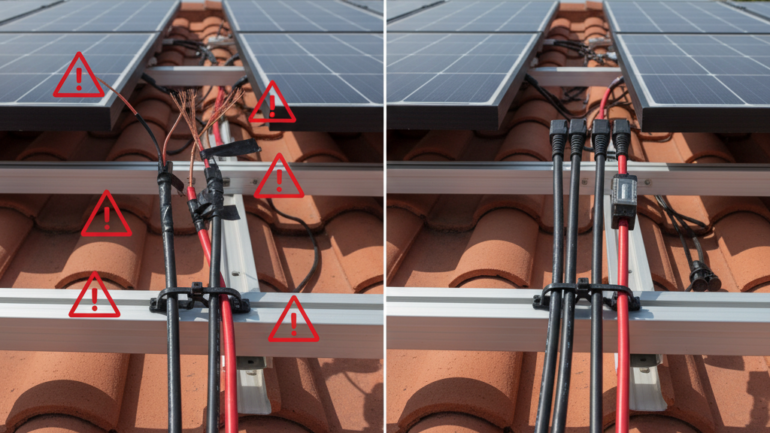
Mistake #4: Poor Connection Quality and Techniques
Loose connections cause more solar system failures than any other single factor. Heat cycling from daily temperature changes loosens improperly made connections over time. Subsequently, loose connections create resistance, generate heat, and eventually fail completely.
Many DIYers use inappropriate connectors or fail to properly crimp terminals. Twist-on wire nuts, common in AC applications, don’t work reliably in DC solar circuits. Instead, proper crimped connections with heat shrink provide long-term reliability.
How to Fix It:
- Use MC4 connectors for all panel interconnections
- Invest in proper crimping tools, not generic pliers
- Apply heat shrink tubing over all splice connections
- Torque all terminal connections to manufacturer specifications
Regular connection inspections prevent small problems from becoming major failures. Therefore, check all connections annually for signs of corrosion, heat damage, or loosening.
Mistake #5: Ignoring Grounding and Bonding Requirements
Proper grounding protects people and equipment from electrical faults and lightning strikes. Many DIYers skip grounding requirements, thinking small systems don’t need protection. However, even portable solar setups benefit from proper grounding practices.
Equipment grounding connects metal frames and enclosures to ground, providing fault protection. System grounding references one DC conductor to earth ground for code compliance. Additionally, bonding jumpers ensure electrical continuity between all metal components.
How to Fix It:
- Install grounding lugs on all panel frames
- Run equipment grounding conductors with all circuit wiring
- Use listed grounding hardware and corrosion-resistant materials
- Connect system ground according to local electrical codes
Moreover, regular safety checks help identify grounding issues before they become dangerous. Test all ground connections with a multimeter during routine maintenance.
Prevention Tips and Best Practices
Preventing wiring mistakes starts with proper planning and education. Study electrical fundamentals before touching any wires. Additionally, local building departments often provide helpful resources for DIY installers.
Create detailed wiring diagrams before starting any installation. Mark wire sizes, fuse ratings, and connection points clearly. Furthermore, take photos during installation for future reference and troubleshooting.
Invest in quality tools and materials from the beginning. Cheap connectors and inadequate crimpers cause more problems than they solve. Subsequently, professional-grade components provide better long-term value despite higher upfront costs.
When to Call a Professional
Some wiring situations require professional expertise, especially grid-tied connections and complex electrical panels. Additionally, many jurisdictions require licensed electricians for certain types of installations. Therefore, know your limits and local requirements before starting.
If you discover existing wiring mistakes in your system, prioritize safety over saving money. Dangerous conditions like overheated wires or loose connections need immediate attention. Meanwhile, starting with simpler projects builds confidence and skills gradually.
Professional inspections provide valuable learning opportunities for DIY installers. Many electricians welcome curious homeowners who want to understand their systems better. Consequently, this knowledge helps you maintain your system more effectively.
Moving Forward with Confidence
Understanding these common wiring mistakes transforms you from a hesitant beginner into a confident solar installer. Proper planning, quality materials, and careful attention to detail prevent most problems. Moreover, regular maintenance keeps your system running safely and efficiently for decades.
Start small and build your skills gradually with simple projects. Each successful installation teaches valuable lessons and builds confidence. Therefore, patience and persistence lead to mastery of solar wiring techniques.
Remember that even professionals make mistakes sometimes. The key difference lies in recognizing problems early and fixing them promptly. With this knowledge, you can build safe, reliable solar systems that provide years of clean energy.